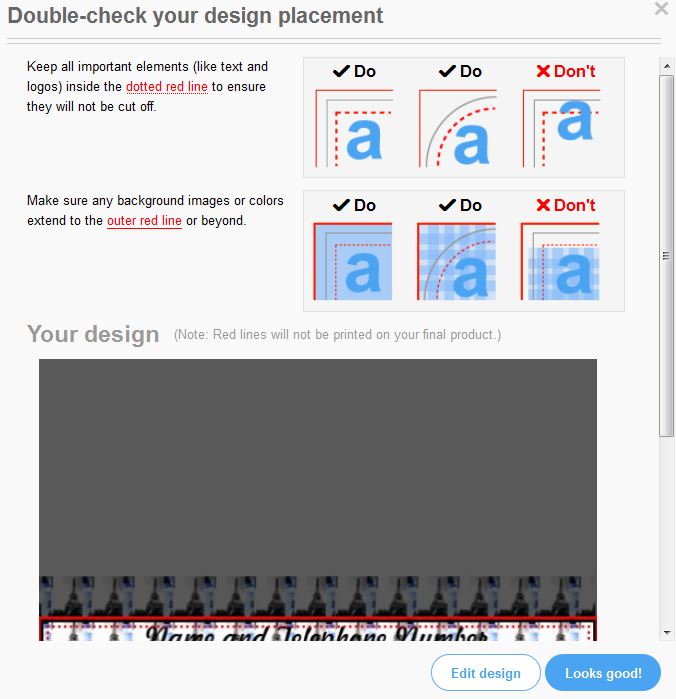
Mhh… is anyone else slightly annoyed by this new “Double-check your design areas” feature on some cases and envelopes? Ok, we need to check spelling and whether the image is big enough but PLEASE why on our own quick create products? It gets annoying when I have to click “ok” 20 times just because I had to maximize the image 😦
Here are a few screenshots to show you what I mean:
Double-check your design areasDouble-check your design areasDouble-check your design areas
Just because I wanted to change the photo from “fill” to “fit” I had to click “Looks good!” THREE TIMES! Zazzle, please change this.
Starting July 20th (Zazzle only updates pricing due to royalty changes once a month), I will conduct an experiment. My goal is to increase sales and what will I try to achieve this? Well, my current royalty is set to 14.9% (not 15% since then Zazzle deducts 5% of your royalty earnings for fees). During my experiment, I will lower the royalty rate to 5% to the more expensive products on Zazzle, including canvas prints, messenger and laptop bags and things I seem to never sell, e.g. wristlets, wallets, belt buckles and some other stuff. On the other hand, I will increase the royalty on my 10 or 20 most popular items to 30% to see whether this will make them less attractive.
Sorry, I only wrote this manual in German but if you follow the links I have included, you will get to English guides explaining how to create your own templates for quick create on Zazzle.
Wozu ist das gut?
Man kann damit ALLE auf Zazzle erstellbaren Produkte abdecken und ist nicht auf die limitiert, die von Zazzle während der Schnellerstellung vorgegeben werden.
Schritt 1:
Um die Übersicht zu behalten, empfehle ich zuerst in eurem Shop eine neue Kategorie zu erstellen. Nennt diese z.B. “Vorlagen”. Wenn ihr die Kategorie auf “versteckt” setzt, kann sie niemand sehen. Wenn ihr die Vorlagen freigeben möchtet für andere, dann macht sie nicht versteckt. Geschmackssache!
Schritt 2:
Sucht euch die Produkte raus, die ihr als Vorlagen möchtet. Wenn das alle sein sollen, dann nehmt euch ein paar Stunden Zeit, denn es werden so etwa 170.
Wenn nicht (wobei ich die Screenshots empfehlen kann!) geht es weiter mit
Schritt 4:
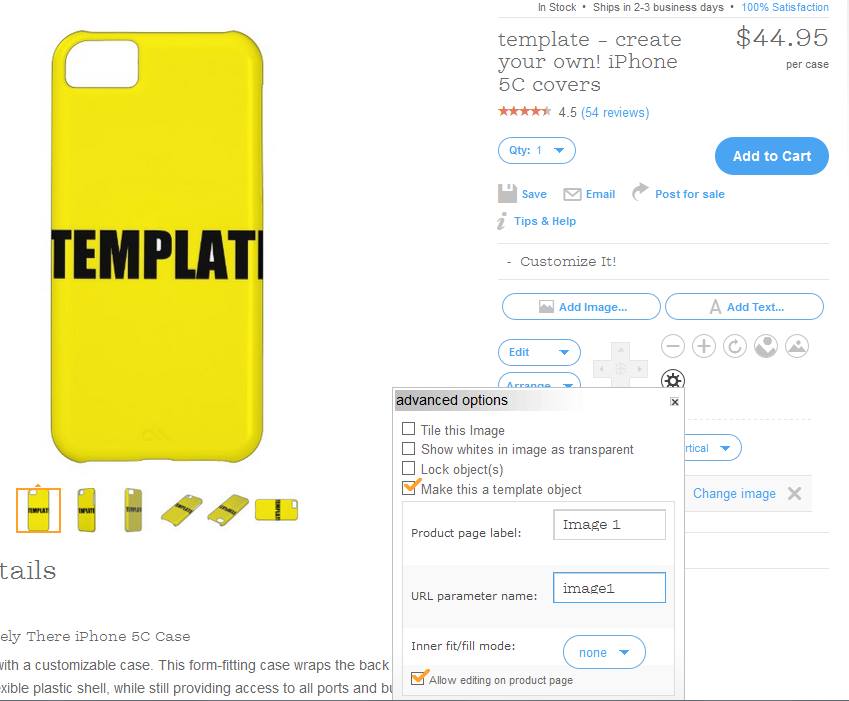
Erstellt ein Produkt erst mal ganz normal – also Bild hinzufügen.
Dann geht ihr in die Einstellungen des Bildes (über das Zahnradsymbol) und setzt das Häkchen für “als Vorlage verwenden” und JETZT kommt der ALLERALLERALLERWICHTIGSTE Teil bei der gesamten Vorlagenerstellung. Wenn ihr das nicht beachtet, werdet ihr euch wie ich über ein Jahr nur ärgern, was das für ein Sch**ß ist und es nichts bringt und überhaupt, was soll daran so toll sein?
Benennt das Bild UNBEDINGT Image 1 oder es wird später nicht durch euer Bild ersetzt werden. Meistens steht zuerst Image 0 da, macht unbedingt aus der 0 eine 1!
Create your own Quick Create Template on Zazzle
Die Screenshots in dieser Anleitung passen auch sehr gut dazu:
Bei “Product page label” muss Image 0 stehen und bei “URL parameter name” muss image0 stehen – Vorsicht mit dem Leerschritt!
Wollt ihr einen Vorlagenartikel erstellen, der beidseitig bedruckt wird (z.B. Tischkarten) dann macht ihr diesen Schritt entweder zweimal (einmal pro Seite) oder ihr macht erst eine Seite, kopiert das richtig eingestellte Foto dann auf die zweite Seite – die Einstellungen inklusive der Benennung “Image 1” werden dabei übernommen.
Schritt 5:
Geht dann auf “sell product” oder “zum Verkauf anbieten”, wenn ihr fertig seid. Beim Titel und der Beschreibung reicht ein einfaches “Template” oder “Vorlage”. Wählt die Shopkategorie aus, die ihr für Vorlagen gemacht habt. Achtung: Wenn ihr irgendwann 100 Vorlagen in der Kategorie fertig habt braucht ihr eine zweite Kategorie, weil die Schnellerstellung nur 100 Produkte auf einmal kann.
Da man ein Tag/Schlagwort angeben muss empfehle ich auch Template oder Vorlage. Als Shopkategorie könnt ihr irgendwas nehmen, aber nehmt vorsichtshalber immer das gleiche (der Einfachheit halber also z.B. immer die oberste oder immer “Zielgruppe – für jeden”. Unter der Altersfreigabe könnt ihr noch angeben ob die Vorlage für alle sichtbar sein soll oder nicht. Wenn ihr schon eure Vorlagenkategorie im Shop unsichtbar gemacht habt, dann könnt ihr nun auch “versteckt” wählen. Doppelt hält besser. Wollt ihr die Vorlage freigeben, dann ist “public” in Ordnung. Wählt unbedingt JA bei “als Vorlage verwenden?”
Schritt 6 – die Verwendung:
Wenn ihr die Schnellerstellung beginnt, dann wählt nicht ein Bündel von Zazzle aus, sondern sucht euch direkt darunter eure Shopkategorie mit den Vorlagen heraus.
In May 2014, I was able to achieve 36 successful (since they have turned green) sales on Zazzle. Which is more than one sale per day and definitely above average!
This is the first 2015 calendar print I was able to sell. I really hope I will sell more in the last quarter of 2014 or it was not worth creating them *lol*
The next three sales were all going to the same customer. And she didn’t buy only one of each, Mary from Santa Monica earned me a total of $12 in royalty, thank you so much!
You know, I love to browse Zazzle for all kinds of random keywords and take a look at the products. I also like checking out my competitors that way *g* Anyway, my Times Square wrist watch is number 7 in Zazzle’s hit list *g*
Here are the top 12 Times Square Watches from Zazzle for all fans of New York City: